Landing pages are one of the best ways to sell products online and collect email leads.
But building them yourself is tough!
Especially if you are a non-techie and lack any coding or design skills.
By default, Wordpress itself doesn’t offer much help for creating well-designed landing pages. The default editor is just not well suited for this.
Instapage Review
Last updated: April 13, 2019
First Published on: Feb 25, 2017
tl;dr Summary
Visit the website
Fortunately, there are several landing page services out there that make creating landing pages simple. I’ve talked about Leadpages a lot on this site, but today I want to look at another Leadpages alternative called Instapage.
In this review, I’ll walk you through creating a landing page with Instapage, and then compare it to some other landing page builders to see how it stacks up.
Here’s what I’ll be covering in this Instapage review:
- What is Instapage?
- Building your First Landing Page
- Instapage Pricing
- Instapage vs LeadPages
- Final Thoughts
If you’re already ready to buy, skip to the end of this review and grab my $16,675 Instapage Bonus Package.

What is Instapage?
Instapage is a cloud service that enables you to build landing pages without knowing how to code. You can design any type of landing page you like with it, but it is definitely geared towards making creating squeeze pages, webinar pages and thank you pages.
With Instapage you get:
- 194 (and counting) nice looking pre-made templates.
- A blank page template so you can start a page from scratch.
- An easy to use drag and drop editor to customize your pages and create any design you want
- Simple integration with many popular email service providers including Mailchimp, ConvertKit, and ActiveCampaign.
- Free hosting for your pages on Instapage servers or embed them on your Wordpress blog or Facebook.
- Mobile responsive landing pages that look great on both desktop and mobile devices.
Being able to create a landing page is so critical these days. Especially if you want to collect more leads or have something to promote, like your own product, service or webinar.
It’s definitely a competitive advantage to be able to pump out landing pages quickly because this allows you to more quickly test which ones will get you a more positive ROI. This is even more important if you are testing using traffic sources like Facebook ads or Google Adwords.
Building your First Landing Page
Let’s walk through how Instapage works.
When you first log in to your Instapage dashboard, you will see a list of all the landing pages you have created already.
From here, you can Create a Standard Page which will give you the option to create a page from a template, an AMP Page or upload an Instapage file.
AMP pages are landing pages that are designed to load really fast and designed specifically for mobile. Unfortunately, this is only available as an Enterprise feature of Instapage.
If you go to the Template route, you will see a list of all the available Instapage templates. There are a ton of templates available which can be a lot to scroll through.

Fortunately, you can use the filter options to drill down to a specific subset of templates.
![]()
Although they don’t have the name brand templates that Leadpages offers, I do like the selection of templates you get. They all look very well made, and they remind me of other marketing type landing pages designs I’ve seen elsewhere.
Once you pick your template, you get into the editor.
The Instapage Editor
I really enjoyed playing around with the Instapage editor to design my pages.
The editor is fully drag-and-drop and it allows you to add the following elements to your pages.
- Headlines & Paragraphs
- Images and Videos
- Buttons
- Forms
- Shapes (Box, Circle, Horizontal and Vertical lines)
One of the things I like most about the editor is that it gives you pixel-perfect precision when moving elements around.
Most landing page editors allow you to place widgets in sections and then give you a few alignment options.

But with Instapage, you can move elements anywhere on the page. This gives you amazing freedom to be very creative with your designs.
Elements can also be layered, which means you can place elements on top of each other. For example, you can drag a text element over a circle shape element to create your own combination design elements.
The ability to move elements anywhere on a page is great. But it potentially makes things difficult to get everything aligned properly.
Luckily, Instapage offers a couple of ways to help manage this.
The first is that when dragging elements near other elements, it automatically displays guidelines and pixel distances to help you align elements with each another.
The other is that you can shift-click on multiple elements to select them together. Then use the alignment menu to align everything together horizontally (or vertically) as needed. This is super useful and I found myself using it a lot.
Every element has their own settings which you can customize. For example, here are the button settings.

You can also set click events for Buttons. This allows you to set what happens when a user clicks the button where you can choose your link to point to:
- An external URL
- An Instapage landing page
- Another section on your current landing page
- A file download
- A popup (for implementing 2-step opt-ins)
Other nice things about the editor are that you can easily toggle between Desktop and Mobile views so you can quickly see how your page looks at different screen sizes.
The editor also fully supports undo and redo which I found very handy while designing my pages.
Creating reusable components with Instablocks™
Instablocks™ is one of the newest features added to Instapage.
Some brands have the need to create lots of different landing pages. But while the copy and messaging of each landing page may be different, you’ll likely want to adopt a consistent style across each landing page.
You will have components like headers, testimonials, and pricing tables that will be the same on all your landing pages.
With other landing page builders, you would have to re-create these common components every single time. This is a big time-waster.
But with Instablocks, you create a component once and re-use it anywhere.
On the toolbar of the editor, you’ll see the Instablocks icon on the top left. Clicking on it will bring up a window like this:

You’ll get access to some pre-made blocks (organized by category) that you can use out of the box.
Just click on any block you want to use and hit insert block to add it to your current landing page.
To create your own block, just go to the My Blocks tab and click on the + New Block button. You’ll be taken back to the editor where you can customize and then save your block.
The whole process is super simple. By getting into the habit of creating these block templates, you can start saving a lot of time and effort on every future landing page you build.
Instapage Editor Dislikes
There are few things I don’t like about the Instapage editor, though.
One annoyance I found is that you couldn’t edit properties of multiple elements at one time. On one landing page I was designing, I had several paragraph elements that I had on my canvas for a menu I was creating.
I wanted to be able to select all of these elements and change their color in one fell swoop. But unfortunately, the editor doesn’t allow this.
Another thing I didn’t like is that you can only have one font that applies to every paragraph element on your page, and one font that applies to every headline element.
While it’s not good practice to use tons of different fonts on your pages, it would be helpful to be able to choose between a couple.
Finally, I feel that Instapage lacks the ability to really customize elements exactly how you want them. For many people that’s ok, and they are fine with the options provided.
This is somewhat addressed this with the per-element CSS editor. But not everyone knows how to use CSS so it’s not a solution for everyone.
Publishing Your Page
Once you’re done with your page, you can publish it.
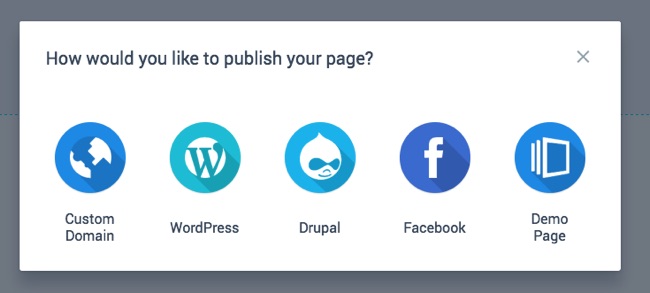
These are the options that Instapage gives you:

Choosing the custom domain option allows you to publish your landing page to any domain you own. No existing site required. It does take a little bit of technical knowledge to update the DNS settings for your domain, but there is a helpful video to walk you through the process.
If you use Wordpress or Drupal, then you can easily publish your pages to those platforms as well.
Publishing to Wordpress requires you to install the Instapage Wordpress plugin on the site you want to publish to. Once installed, enter your Instapage account details to set things up.
All your Instapage pages will then be available from within the plugin settings and you can choose the specific one to publish on to your site.
Publishing to Facebook is also very easy. Just press the button and it will publish your page to as a Page Tab. This is one of the best ways to start your own marketing funnel.
Finally, you also can publish directly to the Instapage demo domain. Choose a subdomain and your page will be published directly to subdomain.pagedemo.co.
This is a fantastic way to demo your landing pages.
I really like the fact that you can download your Instapage landing pages to your computer. This means you can share your landing pages with other Instapage users which is super useful.
Plus it also serves as a local backup of your landing pages. Especially if you decide to stop your Instapage subscription but want to come back at a later date.
Instapage Pricing
Instapage changed their pricing structure as part of their August 2017 update and unfortunately, the service became a lot more expensive.
Instapage has 3 pricing plans. Each plan comes with 200,000 unique visitors a month, 50 published landing pages and 10 team
The Core Plan starts at $79 a month or $69/mo when paid annually and gives you access to most of Instapage’s basic features.
The Optimization Plan starts at $129 a month ($99/mo annually) and it adds everything from the Core Plan, plus A/B split testing, Heatmaps, and Dynamic Text Replacement.
Finally, the Team & Agency Plan starts at $229 a month and gives you access to everything that Instapage offers including 15 sub accounts and branded lead notifications.
Instapage offers a fully functional 14-day free trial as a way to test out the platform. What’s awesome about their trial is that you don’t even have to enter your credit card number to sign up. This removes all the friction from giving Instapage a try.
Instapage vs LeadPages
Instapage is a lot more focused than LeadPages is. That is, it’s all about creating landing pages. Contrast this to Leadpages which besides landing pages, also allows you to create popups with LeadBoxes and get leads via SMS using LeadDigits.
So depending on your business needs this can be good or bad.
Both services have their own drag-and-drop editor. But Instapage gives you pixel precision placement of elements. Leadpages uses a system of rows and columns to place elements, so it’s not as flexible.
Both have similar widgets including useful ones like countdown timers. But Instapage does allow you to add custom shapes for additional design possibilities.
Leadpages’ drag and drop editor was also added later. So it’s in this weird state where they have one set of landing pages that can only be edited with the drag and drop editor, and another set of landing pages that can only be edited with the legacy editor.
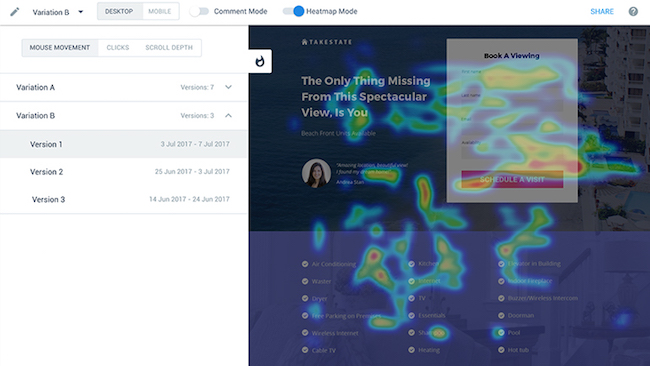
Instapage has Heatmaps which LeadPages does not have. Heatmaps allow you to get insights into how your visitors are behaving on your landing pages. The Heatmap Visualizer will track mouse movement, clicks, and scroll depth for every visitor and it’s a pretty cool way to help you optimize your page.

Instapage also has some neat collaboration features if you work with a team or with clients. You can share your in-progress landing pages with others and have them provide feedback.
Plus, Instablocks™ is a really great feature as well if you have the need to create a lot of landing pages. It will save you a ton of time in the long run, since you don’t have to keep creating the same components for every landing page you build.
Price wise, Instapage is now more expensive than LeadPages with their recent price hike. Both products now offer a 14-day free trial.
Plus, LeadPages doesn’t have any limits on visitors to your pages or the number of landing pages you can create. And you can easily sell products on your LeadPages via the checkout widget, while Instapage doesn’t have anything comparable.
Final Thoughts
Overall, I think Instapage stacks up really nicely to LeadPages and there’s a lot to like about it.
It’s extremely simple to pick up and I especially like the ability to place elements on my landing page exactly where I want them.
It also comes with a very nice selection of landing page templates. This is especially important for those that just want to make some quick edits and publish.
Overall, if you are looking to create landing pages, I think Instapage is a worthy Leadpages alternative. They are constantly updating their platform, and they have their own unique features like Heatmaps that make it extra compelling.
I would definitely recommend taking advantage of their 14-day free trial and playing around with it yourself.
Build your first landing page with Instapage (14-day free trial)
Instapage Bonuses ($16,675 Value)
Did my Instapage review get you interested in taking that free 14-day Instapage trial?
Why not get some extra help to start your Instapage journey with these exclusive Instapage bonuses.

Here is what you will get:
- Bonus #1: Tier5 Mega Software Bundle + Bonus Rights – Get personal access to 6 softwares plus the rights to use them as part of your own bonus offer. ($15,984 value)
- Bonus #2: Ultimate List of Lifetime Recurring Affiliate Programs White Label Rights – List of over 130+ affiliate programs that offer lifetime recurring commissions ($297 value)
- Bonus #3: Million Dollar Ad Swipe Library White Label Rights – Get the exact Facebook ads that 40 of the top internet entrepreneurs are running right now. ($197 value)
- Bonus #4: Free Group Convert silver account – this is my favorite chrome extension to automatically collect the email addresses of members in your FB group. ($197 value)
Take a look at my Instapage bonus page for more details on the above bonuses and how to get them.
Instapage Pros
- Intuitive drag and drop editor that provides pixel-perfect placement of elements.
- The editor supports layers and grouping for additional design precision and flexibility.
- Extensive selection of pre-made beautifully designed landing page templates.
- Create re-usable components via Instablocks that will save you time and effort.
- Download your landing pages to your computer and share them with others.
- Collaboration features allow you to work together with a team to design your landing pages.
- Heatmap visualizer to help you optimize your landing pages.
- Great font selection including both Google and Typekit Fonts.
- Supports Dynamic text insertion for more targeted messaging.
- 14 Day Full Featured Free Trial with no credit card needed.
Instapage Cons
- Missing some direct integrations with Drip, MailerLite, and ONTRAPORT
- One font for headlines and pages.
- Limited to 200,000 visitors and 50 published landing pages.
- Not as easy to sell products directly on your landing pages.

Instapage doesn’t allow monthly or quarterly payment. Have to make one-time payment.
This is their greatest pitfall as I don’t run my Advertisements 12 months continuously.
Hi Agnes. This is not true. You can pay monthly for Instapage, although you will receive a discount if you pay yearly.