Doing site speed optimization on your site can be daunting.
Those page speed suggestions you’re looking at sounds probably look like gibberish to most of you.
I mean what does “leverage browser caching” mean anyway?
Plus it can be a huge time suck once you go down the rabbit hole of trying to fix every issue on your website.
NitroPack Review
Last updated: Oct 28, 2020
Initially published: Oct 28, 2020
Product rating: 4.8 / 5.0
tl;dr Summary
Yet, site speed is a confirmed Google ranking factor.
So it’s worth taking the time to do right.
That’s where Nitropack comes in.
It’s a hands-off site speed optimization service that handles all those technical details for you.
In this NitroPack review, I’m going to show you how it works, and who should use it.
![]()
Here’s what I’m going to cover:
- What is NitroPack?
- Who Is NitroPack For?
- What Are Some Of My Favorite Things About NitroPack?
- What Are The Annoying Things About NitroPack
- A Look Inside NitroPack
- Our Results with NitroPack
- NitroPack Pricing
- Final Thoughts
Get Started with NitroPack For Free
What Is NitroPack?

NitroPack is a performance optimization service for websites, first developed for OpenCart back in 2012. It was then released as a standalone service in 2018 by co-founders Ivailo, Deyan and Simeon.
It uses 36+ website speed improvement technologies—such as compression, modification, and prefetching—to significantly reduce the loading time of your pages and increase your Google Pagespeed score.
While NitroPack aims to increase your score on various page speed tools, its primary focus is true page speed in order to improve your search engine rankings and maximize conversions.
Who Is NitroPack For?
Initially, NitroPack was developed exclusively for e-commerce sites using the OpenCart framework. Meaning it couldn’t be used by anyone with sites built on WordPress or any other CMS.
Fortunately, it now works with WordPress and other e-commerce platforms like Magento and WooCommerce.
But even if you can use NitroPack, it doesn’t necessarily mean you should.
For example, if your site is relatively new, thin on content, and light on heavy media such as images and video, you may not see a significant speed increase from using a plugin like this.
You also have to consider your current tech stack. If you’re already using a caching plugin, it’s likely that some of NitroPack’s optimizations are already deployed on your site. Some hosting providers even do this for you on the server level.
Finally, site speed makes little difference if you don’t have existing traffic. While site speed can improve organic rankings, it’s far from a magic bullet to consistent organic traffic.
In a nutshell, NitroPack is for those who have larger sites with lots of assets, have already exhausted the low-hanging fruit in terms of optimization, and have existing traffic that will benefit from these changes.
Get Started with NitroPack For Free
What Are Some Of My Favorite Things About NitroPack?
Cool Thing #1: Replaces multiple performance plugins
If you’re even a little interested in site speed, there’s a good chance you’re using at least one of the following when it comes to performance tools.
You might be using WP Rocket or Varnish for page caching and cache preloading.
Or Perfmatters to reduce page size and number of HTTP requests.
Or ShortPixel to resize and compress your entire image library. Or compressing images in real-time during initial upload.
Or perhaps Cloudflare CDN to serve your website files from different server locations around the world.
I could go on, but you can already see how messy (and expensive) things get when you start combining different tools together, especially when you factor in potential conflicts.
NitroPack offers a more holistic approach that is capable of replacing each of the services mentioned and above.

Cool Thing #2: It uses context-aware optimizations
There’s no doubt that NitroPack has an impressive feature list, but simply “doing more” is not the only reason for its overnight popularity.
Yes, fundamentally, NitroPack works the same as any other performance plugin. It chips away at the different technical issues on your website to bring down the overall load time.
Where it differs, however, is the way in which NitroPack interprets the relationship between the different problem areas of your site.
Where most plugins will aggressively optimize a resource regardless of anything else that relies on that resource, NitroPack takes this into account in order to maintain the best possible performance.
In other words:
Rather than apply optimizations to each individual resource, it first evaluates all resources on your site, identifies the connections between those resources, and applies optimizations accordingly.
NitroPack refers to this as context-aware optimization and we found it works really well!

Cool Thing #3: Choose from different optimization presets
When you sign in to your NitroPack account and head into the general settings, one of the first things you’ll notice is a control for “optimization level”.
These are presets that allow you to bulk enable features depending on how aggressive these features are considered. NitroPack will even tell you what they are as you can see below:
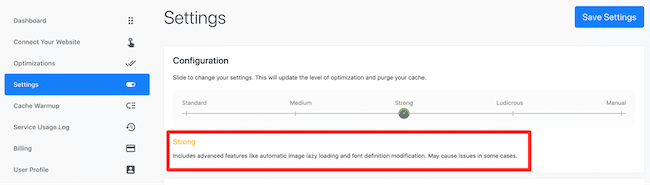
NitroPack themselves recommend keeping this on ‘Strong’, as it provides the best balance of speed and user experience, but you can read more about the different levels here.
The ability to apply a broad optimization level makes NitroPack very easy to work with. And you still have manual options available to you if you prefer a more hands-on approach to optimization.
We will show later in the review.
Cool Thing #4: You can auto-optimize updated content
One of the biggest issues with caching is that any new changes can take hours and sometimes days to be seen on the front-end.
Traditionally, you would manually purge the cache, forcing the system to recrawl and store the updated version of your site. Even then, you typically have to wait for a new visitor to trigger a recrawl for each page.
While you can do this with NitroPack, you don’t need to because it provides two features to automate the process:
- You can enable ‘Automated Behaviour’ to automatically purge the affected cache when a page is published or updated.
- You can enable ‘Cache Warmup’ to automatically recrawl newly published and updated pages without having to wait for organic traffic to visit the relevant pages.

Both of these features in tandem allow NitroPack to quickly identify and re-optimize fresh content on your site with the least possible delay or disruption.
Note: Enabling this will likely use up your monthly quota much faster than usual, so it’s a good idea to check NitroPack’s usage estimation before turning this on permanently.
Get Started with NitroPack For Free
What Are The Annoying Things About NitroPack
Annoying thing #1: It can break important scripts
Speed optimization tools delve deep into the core files of your website and make any number of changes to increase performance, but there’s a catch.
Sometimes, while you may gain a slight or even significant speed increase, one change (or optimization) can directly break an important aspect of your site, and it’s not always immediately obvious.
This is especially common with external scripts, meaning sites that use Google Analytics to monitor their traffic or sites that generate revenue with display ads such as Mediavine or Adthrive.
The good news is, NitroPack provides a way to exclude these scripts from the optimization process:

The bad news is, not many people will be aware of this issue ahead of time, and even then, non-techies may not know which scripts to exclude or how to even find that information.
This issue isn’t unique to NitroPack since many performance plugins will throw up these types of software conflicts, particularly the more aggressive plugins such as this one.
A Look Inside NitroPack
After signing up to NitroPack, you’ll be given access to a dashboard, completely separate from your site.
This dashboard gives you the details of your plan, current usage, number of optimizations, configurations, and tons more. You’ll even get a little virtual tour when you first log in.

The first thing you’ll need to do is choose a “Connector”, which is just a fancy way of saying you need to integrate NitroPack with your chosen platform.
Since I’m using WordPress, I simply downloaded this plugin from the WordPress repository. (Interestingly, there’s only one version of NitroPack whereas most plugins have a dedicated premium version.)

Once the plugin is installed and activated, you can copy over the Site ID and Secret Key from your NitroPack dashboard to activate your license.
You’ll now see a simplified version of the NitroPack dashboard within WordPress, and while you can set the overall “optimization level”, you won’t be able to configure everything the plugin has to offer.

At this point, NitroPack will start running through your site, optimizing individual pages based on the settings you’ve applied.
You can even go into the Optimizations tab of the NitroPack dashboard to see which URLs have been optimized and when exactly they were last optimized.

If you have any problems during the initial setup, make sure you disable any other caching plugins to prevent conflicts.
Standard Optimizations
I won’t get too much into the basic optimizations that NitroPack offers. Not only because these are now expected of most caching plugins but also because there’s just too many to list.
With that in mind, let’s go over some of the more significant optimizations that can be applied to your site.
Code Minification
When you look at any code or language such as HTML, Javascript, PHP, or even CSS, you’ll find that it’s almost always written and structured in a way that makes it more readable to humans.
While it might not seem like much, those extra spaces, line breaks, comments, and formatting do take longer to process, meaning the page loads a little slower than it otherwise would.
The minification process involves removing these unnecessary characters from every line of code on your website, reducing the overall weight of those files, and improving the load performance.
Doing this manually would take an insane amount of time and one slip could break your entire site, while NitroPack pulls it off in a matter of seconds.
Code Compression
Code compression compliments minification because they both exist to solve the same problem; reduce the weight and render time of your code. But compression works in a distinctly different way.
Without getting too technical, when a visitor tries to access your site, the webserver (where your files are stored) sends the relevant data to the browser, and the browser renders that data for the visitor.
The time it takes for the browser to download that data is considered a bottleneck, and so compressing the files on the server means the browser can access it faster because the data is effectively smaller in size.
The most common compression format for this is GZIP, which is faster and more effective at size reduction compared to ZIP compression, which you are probably already familiar with.
Image Optimization
This is one of the best places to start when it comes to improving the speed of a page because it can have such a large impact. Especially using many of the free and cheaply available image optimization plugins like ShortPixel, Kraken, and WP Smush.
They work by finding and converting all your website images to a more web-friendly format—including the Google-developed WebP format. All while maintaining as much of the original image quality as possible.
Image compression can reduce image file sizes by up to 90% in some cases and the end result is often indistinguishable from the original. This process alone can shave off multiple seconds from your load time.
Of course, NitroPack does this just as well as any of the plugins noted above, and it even has another image optimization trick up its sleeve that I’ll talk about later on.
Advanced Optimizations
This is where we start breaking away from the traditional technology that’s been seen in every other caching plugin and look more closely at what really separates NitroPack from other solutions.
Again, this is not a complete list, but I’m noting down a few of the most notable features that I would consider “advanced”.
1. Amazon Cloudfront CDN
A CDN, or Content Delivery Network, is a network of servers in different physical locations around the world. When you use a CDN, you’re effectively copying your website files to each of these servers.
Doing this prevents someone in Europe from having to load your website from a server in North America, for example. Instead, they can retrieve that data from a much closer server, reducing the time it takes to do so.
Many performance tools will allow you to integrate with CDN’s like Cloudflare, including NitroPack. However, if you don’t already have one set up, then NitroPack has a built-in CDN via Amazon Cloudfront.
When you activate NitroPack on your site, Amazon Cloudfront will also be activated by default. And it runs in the background without any manual setup or configuration needed.
2. Critical CSS
CSS is responsible for the styling of your website. It typically lives in an external file (stylesheet), and without it, your pages would be unrecognizable.
Critical CSS refers to the most important part of your styling, which is the part the visitor sees first. Specifically, it applies to content above the fold, where the user doesn’t need to scroll in order to see it.
NitroPack is able to identify critical CSS and place it in your HTML file—also called “inline”. This means it’s given priority in the browser, causing it to load much faster compared to external CSS.
Since inline CSS has priority over external files, including JavaScript, NitroPack ignores external scripts when optimizing for critical CSS, ensuring that all critical styling is actually being utilized.
Unlike some optimizations, this one doesn’t really reduce load time as much as it creates the illusion of a faster page.
3. Advanced Resource Loading
There’s not much information on NitroPack’s website regarding this feature and how it works on a technical level.
From what I can make out, it controls how resources are loaded in the browser, and tells the visitors web browser which resources should be given priority when rendering a page on your site.
You could argue this is a similar technique to the one mentioned above since critical CSS is also just a prioritized resource.
According to NitroPack, doing this “improves render times and page responsiveness”, which gives the impression of a faster loading page without it actually loading faster.
4. Advanced Lazy Loading
Lazy loading of website assets is fairly common practice these days, especially when it comes to images.
It basically prevents an image from being loaded until the visitor scrolls to that specific section of the page. This saves the browser from having to load images that the visitor may never see.
It’s a bit like how YouTube buffers videos. Rather than downloading the entire contents of a video on page load, it buffers a few seconds (or sometimes minutes) ahead of the current watch point.
Many performance plugins offer this feature, but NitroPack takes it to the next level by applying lazy-loading to CSS background images as well, something that’s often overlooked by competing solutions.
Get Started with NitroPack For Free
Our Case Study Results with NitroPack
So how well does NitroPack work?
Well, we’re using NitroPack on SmartBusinessTrends so we can share with you some numbers.
For this test, I wanted to use a particularly media-heavy page with long-form content and lots of user comments.
So I decided to run the tests on our ClickFunnels review post.
Before NitroPack, with no other caching plugins enabled:
- Google Pagespeed scores of 16 out of 100 on Mobile and 58 out of 100 on Desktop.

- GT Metrix page score of 67% with a fully loaded time of 7.2 seconds.

With NitroPack installed, on the ‘Ludicrous’ optimization level:
- Google Pagespeed scores of 84 out of 100 on Mobile and 97 out of 100 on Desktop.

- GT Metrix scored 100% with a fully loaded time of 2.7 seconds

As you can see, NitroPack made a significant impact on this page when looking at key performance indicators. We managed to reduce our Page Load time by 61%, decrease the page size by 87%, and cut down the page requests by 90%!
Those are pretty impressive results!
NitroPack Pricing
NitroPack has 4 different pricing plans and they are all priced for ONE site only.
The first is the NitroPack Free plan. This is a great way to get started because you can quickly see if the service will actually speed up your site.
What’s the catch? An “Optimized by NitroPack” badge will be added to the bottom of your site’s footer. You’re also limited to 200 page optimizations per month.
Then there are the 3 paid NitroPack plans. The main difference between the 3 is how much CDN bandwidth is included and how many page optimizations you get per month.
The Lite plan starts at $29 a month and you get 20,000 page optimizations and 20GB CDN bandwidth.
Which plan you go with, really just depends on how big your site is.
Just for reference, I have about 300 optimized pages on my site, and I’ve used about 1500 page optimizations with 10 days left in my billing cycle.
You can get a NitroPack discount by paying annually. So the $29/mo for the Lite plan goes down to $19/mo if you do that.
NitroPack also comes with a 14-day money-back guarantee.
Final Thoughts – Is NitroPack worth using?
Does all the site speed technical gobbledegook hurt your head? Then NitroPack will be a godsend to you.
It literally takes minutes to set up and the results speak for themselves.
Yes, the cost is a bit more expensive than my previous favorite solution WP Rocket.
But for me, it’s worth it, and it’s the site speed service we’re using on this site.
What’s cool about NitroPack, is that you can just give the free plan a try and see what kind of results you get with it. There’s no credit card required, so there’s no risk to give it a shot and see.
If it significantly outperforms your current caching plugin, then you can make the decision whether to switch over permanently.
Give NitroPack a try and see how it performs for you. I think you will be impressed.
Get Started with NitroPack For Free
NitroPack Pros
- Takes advantage of huge number of optimization techniques to speed up your site
- Uses context-aware optimization (read more)
- Includes advanced optimizations not utilized by most plugins
- Has a built-in CDN via Amazon Cloudfront
- Preset optimization levels for non-techies
- Manual optimization for fine-tuning
- Cache warmup for preemptive caching (read more)
- Automated behaviors to quickly optimize new content
NitroPack Cons
- It can break important scripts on your site
- Some CSS styling may be compromised
- It’s considerably more expensive than competing products